One of the main attractions of a smartwatch is the simple wrist-based notifications, but things can get a little out of control. Read on as we show you how to adjust your Apple Watch notifications to your liking.
How do Apple Watch notifications work?
Before we dive into the actual management of Apple Watch notifications, Let's go over a quick overview of how notifications work by default so you have a solid understanding of notifications and what you may or may not want to modify.
RELATED: How to sync photos with your Apple Watch
By default, your Apple Watch will reflect all notifications from your iPhone. Whatever you have set on the iPhone side (“Yes, I want Twitter notifications; no, I don't want Facebook alerts”) it will simply switch to the Apple Watch. The notifications that are activated when you pair your Apple Watch are cloned and when you install new applications, the notification settings you select at installation are also reflected.
When your iPhone is unlocked and you are using it, Notifications are not sent to your Apple Watch, since you are supposed to be looking at your iPhone and a notification on the wrist is not required. When your Apple Watch is off your wrist, locked or in do not disturb mode, all notifications are also muted on the clock level and remain on your iPhone.
When your iPhone is idle or locked and your Apple Watch is on your wrist, unlocked and do not disturb mode is disabled, all notifications are transferred from iPhone to Apple Watch to properly alert you.
In the following sections, we will see how to temporarily silence notifications, how to manage notifications (both in mirror mode and clock mode) and how to make your notifications more private so they don't reveal your content (posts, images, etc.) without your recognition.
How to silence your Apple Watch
While you can permanently mute individual notifications, sometimes you just need to silence things until the meeting is over. There are a couple of ways to silence your Apple Watch; Let's go over the different methods and you'll be armed with the right trick for the right environment the next time you need to prevent your wrist from beeping..
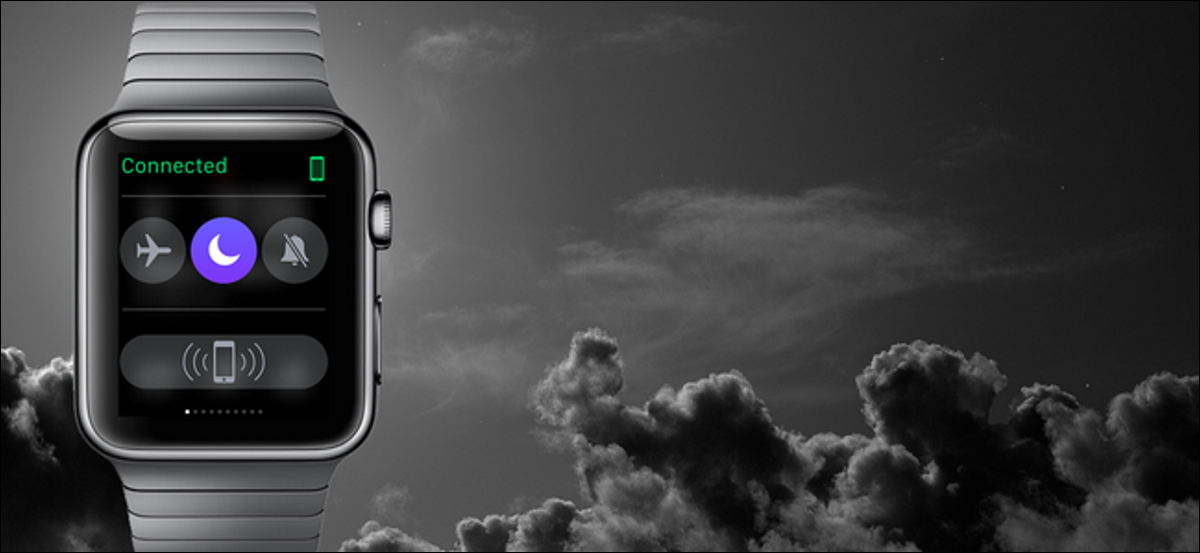
Silent mode and cover to mute
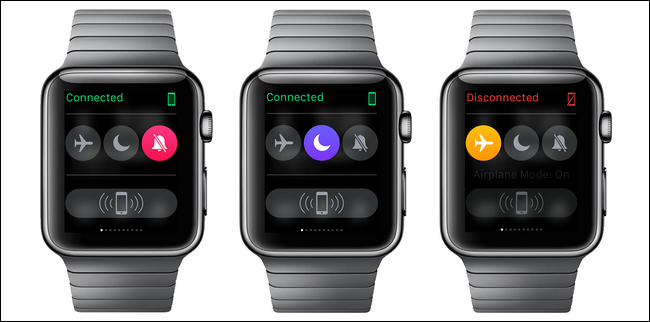
The first and most literal way to silence your Apple Watch is to mute the volume with silent mode.. You can access the mute function / silent mode of two ways. You can swipe down on the watch face to open your looks and then open the settings view where you will find a crossed out bell icon. Press the bell icon and enable silent mode.
The alternative way to silence the watch is to click on the crown, open the Settings menu and navigate to Settings -> Sounds and haptics. There you can adjust the volume of the alerts and activate the Mute function.
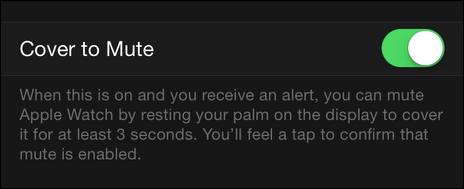
There is a very cool trick that you will need to use the Apple Watch app on your iPhone to enable (but it's worth the least effort): cover to mute. Open the Apple Watch app and navigate to Sound & Haptics in the main configuration list.
Inside Sound & Haptics, active “Cover to Mute”. Now, if a strong notification interrupts your meeting, you can perform the very natural movement of covering your watch with your other hand and that action will silence the notification.
Do not disturb mode
Conveniently, because the Apple Watch is so tightly integrated with the iPhone, you can activate do not disturb mode on watch or phone and it is automatically mirrored between the two devices. (This also means that if you have set a Do Not Disturb schedule on your iPhone, it will also automatically extend to your watch).
To enable Do Not Disturb from your Apple Watch, swipe down from the main screen to access your looks and use the quick access button in the settings view. You can also swipe up on your iPhone screen to access the Control Center and tap the Do Not Disturb icon there as well..
Do not disturb mode should be considered a more silence but not silent, solution; Any adjustments you have made in the Do Not Disturb settings on your iPhone will be used by your watch (for instance, if you have told Do Not Disturb to allow phone calls from your favorite contact list, your watch will also allow them).
Airplane mode
If you are super paranoid (or your boss doesn't have much fun with interruptions), you can always go for a full network kill switch and activate airplane mode. Like silent mode and do not disturb mode, you can toggle airplane mode from your watch settings overview. Nevertheless, unlike do not disturb mode, not reflected between devices. Airplane mode toggles independently for both Apple Watch and iPhone.
How to manage your notifications
Temporarily silencing notifications is one thing, but sometimes you don't want to receive any notification anymore. There are two ways to deal with notification overload on your Apple Watch: from the iPhone settings and from the settings menu of the Apple Watch application.
Adjust iPhone notifications
The first way to manage your notifications involves simultaneously adjusting your notifications on both your iPhone and Apple Watch by making radical adjustments to the notifications of both through the iPhone Settings menu via Settings -> Notifications.
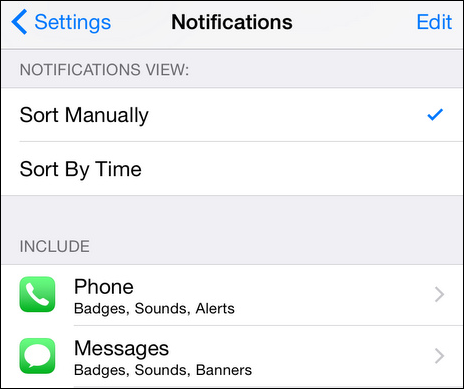
Remember that the default state is that all iPhone notification settings are reflected on your Apple Watch. If you adjust the notification grade in the iPhone Settings, the notification will also be adjusted to the Apple Watch. If you turn off a notification at the iPhone level, it won't even be available for adjustment on the Apple Watch.
Adjust Apple Watch notifications
Inside the Apple Watch app on the iPhone (not on the clock itself) you can disable notifications and adjust notifications specifically for the watch.
Apple's main applications, like Calendar apps, Mail and Reminders, can be customized within the Apple Watch app to customize the notification experience. You can leave them as “Mirror my iPhone” or you, application by application, can make adjustments. Let's say, for instance, you want to see the upcoming events on your calendar, but you don't want to be alerted on your wrist every time an attendee confirms their attendance. You can adjust those settings on the iPhone, but that would remove notifications on both phone and watch.
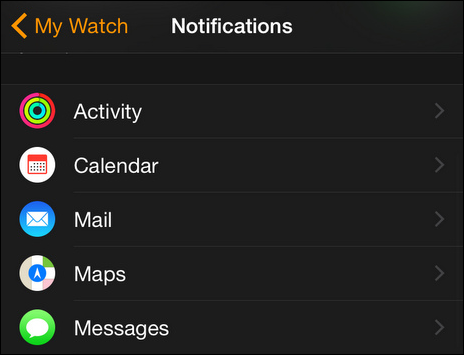
Instead, you can enter the Apple Watch app and make the adjustment by selecting the Calendar app and checking “Personalized”. This, at the same time, will show notification options only for the clock that you can adjust to your liking.
While that customization works for the main iOS apps, does not work for third party apps like Facebook. For third party applications, the change is binary: either you get all the notifications from your iPhone or you don't get any.
How to make your notifications private
The last notification tweak that we'll highlight before finishing our notification tutorial is a terribly useful tweak.. By default, when you get a notification on your Apple Watch it shows what is the notification. If your friend texts you with an inappropriate picture for work, for instance, the preview of that image appears on the face of your Apple Watch, where coworkers who don't share her particular sense of humor might see her.
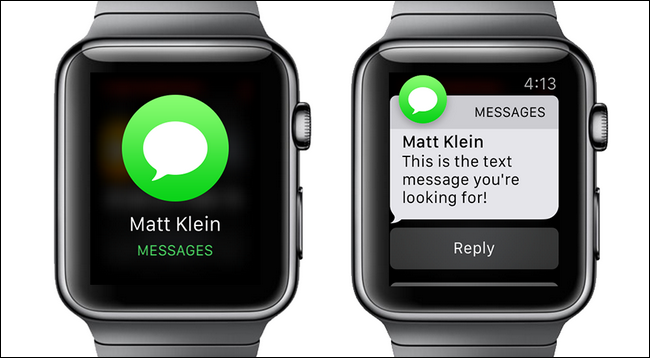
This is where notification privacy comes in.. When privacy of notifications is enabled, you still get a visual alert on the watch, but the content of the alert is not revealed until you touch the screen to confirm that you want to see it.
In the example above, you can see the privacy function in action: when I got a message from fellow How-To Geek writer Matt Klein, I was still notified that I had a message from him, but the content of the message was not displayed until touch screen. Other apps provide even less information. When you receive a notification from Gmail, for instance, it's just the Gmail logo and you have to tap on it to see the message.
While it adds an extra layer and a bit of friction to your notification system, it's a big compromise between not receiving notifications and having the content of your notifications visible to everyone.
With just a little tweak and a lot of leveraging of the streamlined notification system found on the Apple Watch, you will have your notifications controlled and correct in no time.
setTimeout(function(){
!function(f,b,e,v,n,t,s)
{if(f.fbq)return;n=f.fbq=function(){n.callMethod?
n.callMethod.apply(n,arguments):n.queue.push(arguments)};
if(!f._fbq)f._fbq = n;n.push=n;n.loaded=!0;n.version=’2.0′;
n.queue=[];t=b.createElement(e);t.async=!0;
t.src=v;s=b.getElementsByTagName(e)[0];
s.parentNode.insertBefore(t,s) } (window, document,’script’,
‘https://connect.facebook.net/en_US/fbevents.js’);
fbq(‘init’, ‘335401813750447’);
fbq(‘track’, ‘PageView’);
},3000);


