Do you want your new Linux program to look professional?? give a man page. We will show you the easiest and fastest way to do it.
The pages of man
There may be some truth to the old Unix joke, “the only command you need know is man. ” the man Pages contain a wealth of knowledge and should be the first place to go when you want information about a command.
Provide a man page of a utility or command you have written elevates you from useful code to fully formed Linux package. People expect a man page to be provided for a program that has been written for Linux. If it is natively compatible with Linux, man The page is required if you want your program to be taken seriously.
Historically the man the pages have been written using a set of formatting macros. When you call man to open a page, llama groff for read the file and generate a formatted output, according to the macros in the file. The output is piped to less, and subsequently shown for you.
Unless you believe man pages often, writing one and manually inserting macros is hard work. The act of creating a man page that parses properly and looks good may exceed your goal of providing a concise description, but complete, of your command.
You must focus on your content, don't fight a dark set of macros.
RELATED: How to use the Linux man command: hidden secrets and basics
pandoc to the rescue
the pandoc Program reads markup files and generates new ones in about 40 different markup languages and document formats, including that of man page. Totally transform the man page writing procedure so you don't have to struggle with hieroglyphs.
To start, can install pandoc in Ubuntu with this command:
sudo apt-get install pandoc

In Fedora, the command you need is the following:
sudo dnf install pandoc

In Manjaro, scribe:
sudo pacman -Syu pandoc

RELATED: How to use pandoc to convert files on the Linux command line
Sections of a man page
man Pages contain sections that follow a standard naming convention. The sections you man the needs of the page are dictated by the sophistication of the command you are describing.
Minimally, most man pages contain these sections:
- Name: The name of the command and a short summary describing its function.
- Synopsis: A concise description of the invocations someone can use to start the program. These show the types of accepted command line parameters.
- Description: A description of the command or function.
- Choices: A list of command line alternatives and what they do.
- Examples of: Some examples of common use.
- Output values: Possible return codes and their meanings.
- Insects: A list of known bugs and quirks. Sometimes, this is complemented with (or is replaced by) a link to the project issue tracker.
- Author: The person or persons who wrote the command.
- Copyright: Your copyright message. These also usually include the type of license under which the program is launched.
If you look at some of the more complicated man pages, you will see that there are also many other sections. As an example, try man man. Despite this, you don't have to include them all, only the ones you really need. man the pages are no place for verbiage.
Some other sections that you will see quite frequently are:
- See also: Other commands related to the topic that some would find useful or relevant.
- Records: A list of files included in the package.
- Warnings: Other points to know or pay attention.
- History: A history of changes for the command.
Sections of the manual
The Linux manual consists of all the man pages, which is later divided into these numbered sections:
- Executable programs: The shell commands.
- System calls: Functions provided by the kernel.
- Calls to the library: Functions within program libraries.
- Special files.
- Conventions and file formats: As an example, “/ etc / passwd”.
- Games.
- Different: Macro Packages and Conventions, What
groff. - System administration commands: Regularly reserved for root.
- Kernel routines: Not usually installed by default.
Each man The page must indicate which section it belongs to, and also must be stored in the appropriate location for that section, as discussed below. the man command and utility pages belong to section one.
The format of a man page
the groff The macro format is not easy to analyze visually. Conversely, the discount is very simple.
Below is a man page on groff.
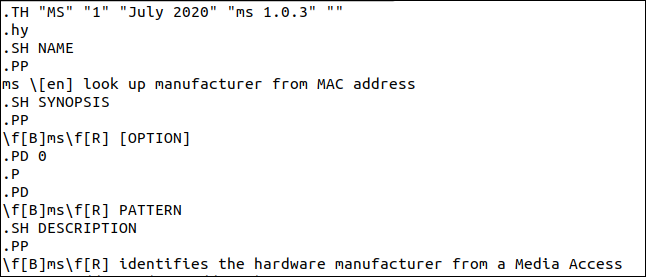
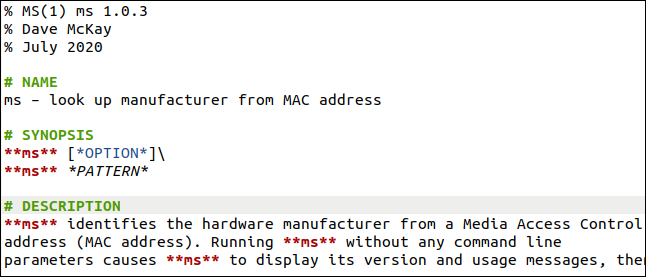
The same page is shown below on sale.
Front matter
The first three lines form something called main issue. All of these should start with a percent sign (%), no leading spaces, except one after, followed by:
- The first line: Contains the name of the command, followed by the manual section in parentheses, no spaces. The name becomes the left and right sections of the
manPage Header. By convention, command name is capitalized, even though you will find many that are not. Everything that follows the command name and manual section number becomes the left section of the footer. It is convenient to use this for the version number of the software. - The second line: The (the) Name (s) of the (the) Author (it is). These are displayed in an automatically generated authors section of the
manpage. You don't need to add a section “Authors”, just include at least one name here. - The third line: The date, which also becomes the central part of the footer.
Name
Sections are indicated by lines beginning with a pound sign (#), which is the markup that indicates a heading in the markup. The number sign (#) must be the first character on the line, followed by a space.
The name section has a single line that includes the name of the command, a space, a dash (-), a space and then a very brief description of what the command does.
Synopsis
The synopsis contains the different formats that the command line can take. This command can accept a search pattern or command line option. The two asterisks (**) on either side of the command name means that the name will be displayed in bold in the man page. Only one asterisk (*) on both sides of a text makes the man page to display underlined.
By default, a line break is followed by a blank line. To force a hard break without a blank line, you can use a backslash at the end ().
Description
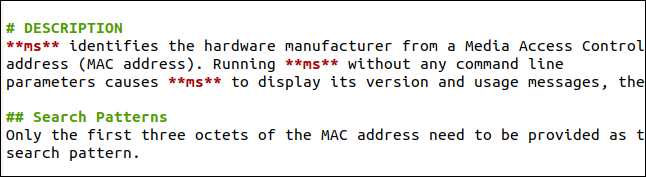
The description explains what the command or program does. Must cover important details succinctly. Remember, you are not writing a user guide.
Using number signs (##) at the beginning of a line create a level two heading. You can use them to break your description into smaller parts.
Choices
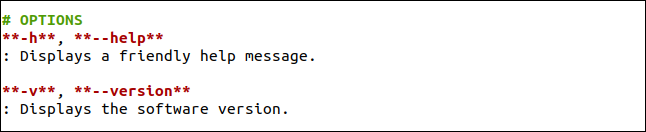
The alternatives section contains a description of the command line alternatives that can be used with the command. By convention, these are shown in bold, therefore include two asterisks (**) before and after them. Include the text description of the alternatives on the next line and start with a colon (:), followed by a space.
If the description is short enough, man will show it on the same line as the command line option. If it's too long, displayed as an indented paragraph starting at the line below the command line option.
Examples of
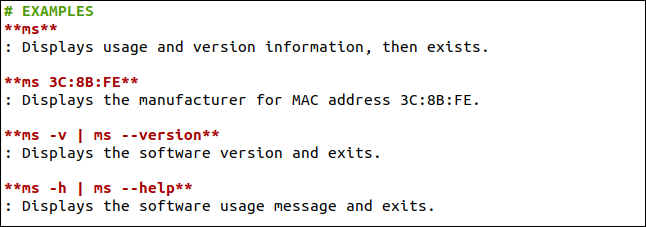
The examples section contains a selection of different command line formats. Note that we start the description lines with a colon (:), in the same way we did with the alternatives section.
Output values
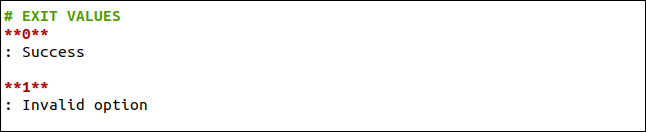
This section lists the return values that your command sends to the calling procedure. This could be the shell if you called it from the command line, or a script if you launched it from a shell script. We start the descriptive lines with a colon (:) in this section also.
Insects

The bugs section lists known bugs, the traps or quirks that people should know about. For open source projects, It is common to include here a link to the project's problem tracker to check the status of any bugs or report new ones..
Copyright

The copyright section contains your copyright statement and, in general, a description of the type of license under which the software is released.
An efficient workflow
You can edit your man page in your favorite editor. Most of those that support syntax highlighting will be aware of the markdowns and color the text to highlight the titles, as well as bold and underline it. That's cool as far as possible, but you are not seeing a render man page, which is the true test in the pudding.
Open a terminal window in the directory that contains your markdown file. With him open in his editor, periodically save your file to your hard drive. Every time i do, you can run the following command in the terminal window:
pandoc ms.1.md -s -t man | /usr/bin/man -l -

Once you have used this command, you can press the up arrow to repeat it and then press Enter.
This command also invokes pandoc in the sale file (here, is named “ms.1.md”):
- the
-s(Independent) generates a full top to bottommanpage, instead of just text inmanformat. - the
-tThe option (output type) with the operator “man” indicatespandocto generate its output inmanformat. We have not saidpandocto send your output to a file, so it will be sent tostdout.
We are also channeling that output to man with the -l (local file) option. Dice man don't search through man database looking for the man page. Instead, it should open the named file. If the file name is -, man will take your input from stdin.
This comes down to you can save from your editor and hit Q to close man if it is running in terminal window. After, you can press the up arrow, followed by Enter to see a rendered version of your man page, just inside man.
RELATED: What are stdin, stdout y stderr en Linux?
Creating your man page
Once you have completed your man page, you must create a final version and then install it on your system. The following command says pandoc to generate a man page called “ms.1”:
pandoc ms.1.md -s -t man -o ms.1

This follows the convention of naming the man page after the command you describe and adding the manual section number as if it were a file extension.
this creates a file “ms.1”, what is our new man page. Where do we put it? This command will tell us where man seeks man pages:
manpath

The results give us the next information:
- / usr / share / man: The location of the standard library of
manpages. We do not add pages to this library. - / usr / local / share / man: This symbolic link points to “/ usr / local / man”.
- / usr / local / man: This is where we should place our new
manpage.
Note that the different sections of the manual are contained in their own directories: man1, man2, man3, etc. If the section directory does not exist, we must create it.
To do it, we write the following:
sudo mkdir /usr/local/man/man1
Then we copy the file “ms.1” to the correct directory:
sudo cp ms.1 /usr/local/man/man1
man wait for the man pages to compress, therefore we will use gzip to compress it:
sudo gzip /usr/local/man/man1/ms.1
To make man add the new file to your database, write the following:
sudo mandb

That is all! Now we can call our new man page just like any other writing:
man ms

Our new man the page is found and displayed.
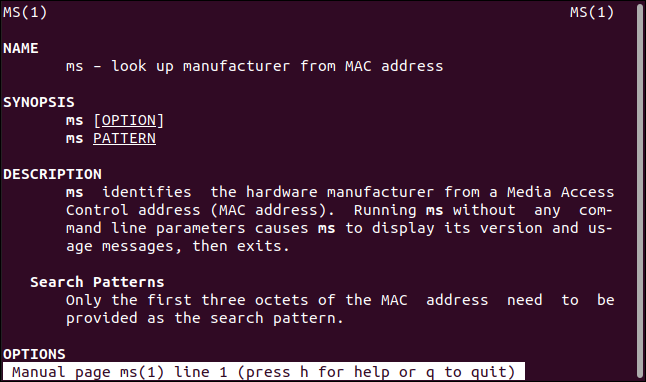
Looks like any other man page, with bold text, underlining and indentation in the appropriate places.
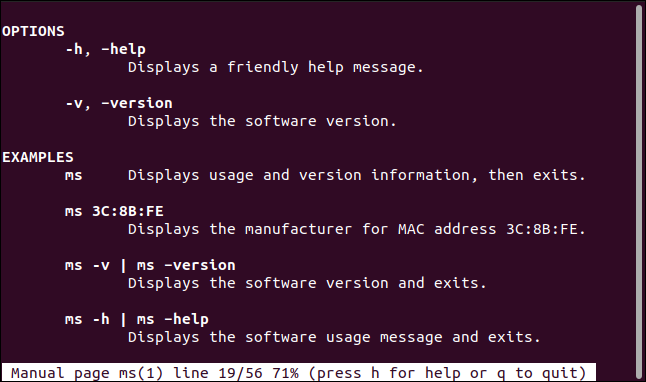
Description lines that wrap next to the option they describe appear on the same line. Lines that are too long to fit appear below the option they describe.

We have also automatically generated a section of “Authors”. The footer also includes the version number of the software, the date and name of the command, as stated on the main page.
If you wish . . .
One time pandoc has created your man page, you can also directly edit the file in the groff macro format before moving it to the man page directory, and gzip that.


