With fail2ban, your Linux computer automatically blocks IP addresses that have too many connection failures. It's self-regulating safety! We will show you how to use it.
Security Security Security
Duchess of Windsor, Wallis Simpson, once said: “You can never be too rich or too thin”. We've updated this for our modern, interconnected world: you can never be too careful or too safe.
If your computer accepts incoming connection requests, What Safe cover (SSH) connections, it acts as a web or email server, you need to protect it from brute force attacks and password guessers.
To do it, you will need to monitor connection requests that do not enter an account. If they fail to authenticate repeatedly in a short period of time, they should be prohibited from making further attempts.
The only way this can be practically achieved is to automate the entire procedure. With a little simple setup, fail2ban will manage the monitor, ban and override the ban for you.
fail2ban integrates with Linux firewall iptables. Enforce bans on suspicious IP addresses by adding rules to the firewall. To keep this explanation tidy, we are using iptables with an empty rule set.
Of course, if you are concerned about safety, you probably have a firewall configured with a well-populated set of rules. fail2ban only add and remove your own rules—Your regular firewall functions will remain intact.
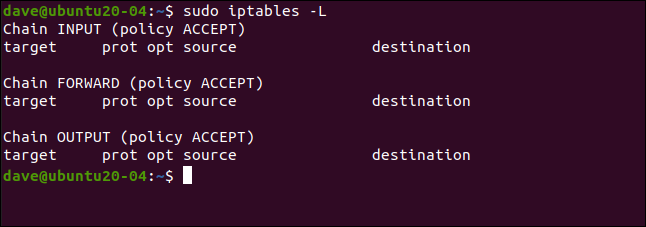
We can see our empty rule set using this command:
sudo iptables -L
RELATED: The iptables Beginner's Guide, Linux firewall
Installing fail2ban
installing fail2ban is simple in all the distributions we use to research this post. In Ubuntu 20.04, the command is as follows:
sudo apt-get install fail2ban

In Fedora 32, scribe:
sudo dnf install fail2ban

In Manjaro 20.0.1, we use pacman:
sudo pacman -Sy fail2ban

Configuring fail2ban
the fail2ban the installation contains a default configuration file named jail.conf. This file is overwritten when fail2ban is updated, so we will lose the changes if we customize this file.
Instead, we will copy the jail.conf file to one called jail.local. By putting our configuration changes in jail.local, persist in updates. Both files are automatically read by fail2ban.
This is how the file is copied:
sudo cp /etc/fail2ban/jail.conf /etc/fail2ban/jail.local

Now open the file in your favorite editor. We are going to use gedit:
sudo gedit /etc/fail2ban/jail.local
We will look for two sections in the archive: [DEFAULT] and [sshd]. Despite this, be careful to find the actual sections. Those tags also appear near the top in a section that describes them., but that's not what we want.
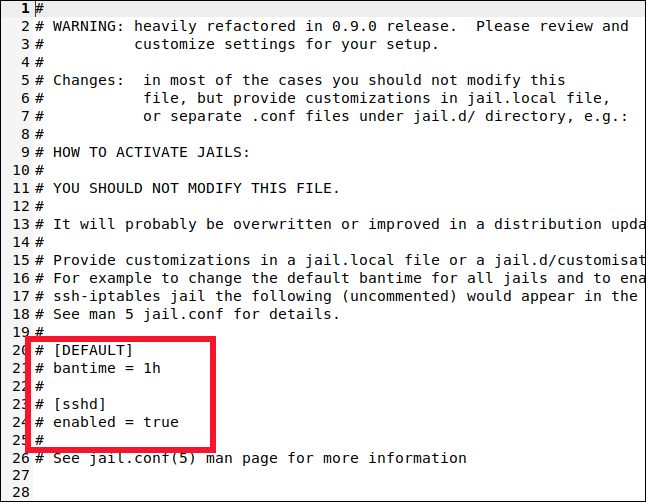
You will find the [DEFAULT] section somewhere around the line 40. It is a long section with a lot of comments and explanations.
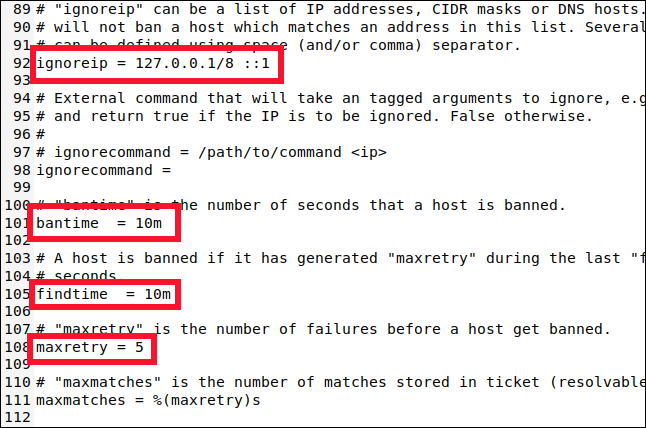
Scroll down to the line 90 and you will find the following four settings you need to know:
- ignorarip: A whitelist of IP addresses that will never be banned. They have a permanent card to get out of jail for free. the localhost IP address (
127.0.0.1) is listed by default, along with its identical IPv6 (::1). If there are other IP addresses that you know should never be banned, add them to this list and leave a space between each one. - bantime: The duration for which an IP address is prohibited (the “m” means minutes). If you enter a value without a “m” O “h” (for hours), will be treated as seconds. A value of -1 permanently ban an IP address. Be very careful not to get permanently blocked.
- search time: The amount of time within which too many failed connection attempts will result in an IP address being banned.
- maxretry: The value of “too many failed attempts”.
If a connection is made from the same IP address maxretry failed connection attempts within the findtime time course, are prohibited for the duration of the bantime. The only exceptions are the IP addresses in the ignoreip ready.
fail2ban puts IP addresses in jail for a specified period of time. fail2ban admits many different prisons, and each of them represents that the configuration applies to only one type of connection. This enables you to have different settings for various types of connection. Or you can have fail2ban monitor only a chosen set of connection types.
You may have guessed it from the [DEFAULT] section name, but the settings we have seen are the default. Now, Let's see the configuration of the SSH jail.
RELATED: How to graphically edit text files in Linux with gedit
Set up a jail
Prisons enable you to move connection types in and out of fail2ban's surveillance. If the default settings don't match what you want the jail to apply, can determine specific values for bantime, findtime, and maxretry.
Scroll down to the line 280 and you will see the [sshd] section.
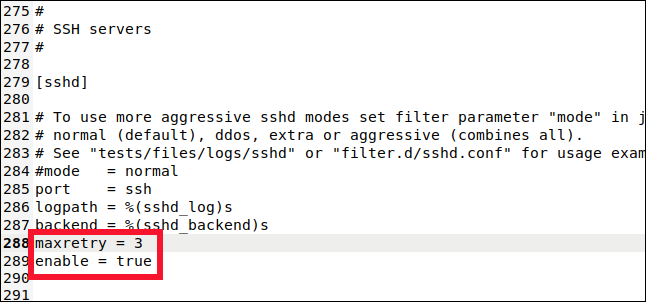
This is where you can determine values for the SSH connection cage. To include this jail in the monitoring and prohibition, we have to write the next line:
enabled = true
We also write this line:
maxretry = 3
The default setting was five, but we want to be more cautious with SSH connections. We lower it to three, and then we save and close the file.
We add this jail to fail2ban's monitoring and overriding one of the default settings. A jail can use a combination of jail-specific and default settings.
Enabling fail2ban
Up to now, we have installed fail2ban and i configured it. Now, we have to enable it to run as an autostart service. After, we need to test it to make sure it works as expected.
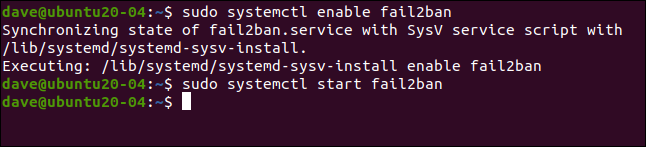
To allow fail2ban as a service, we use the systemctl command:
sudo systemctl enable fail2ban
We also use it to start the service:
sudo systemctl start fail2ban
We can check the status of the service using systemctl, what's more:
sudo systemctl status fail2ban.service
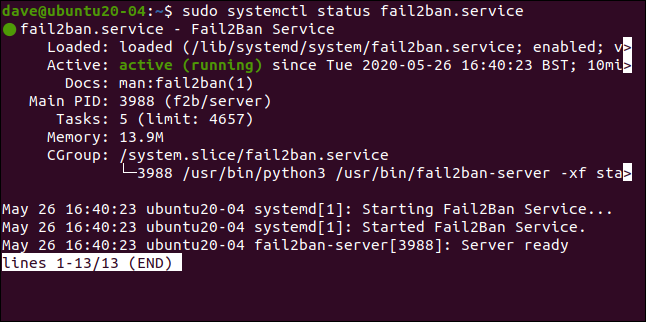
Everything looks good, we have green light, therefore everything is fine.
Let's see if fail2ban do you agree:
sudo fail2ban-client status
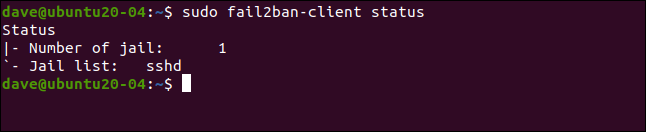
This reflects what we configure. We have enabled a single jail, call [sshd]. If we include the name of the jail with our previous command, we can take a deeper look at it:
sudo fail2ban-client status sshd
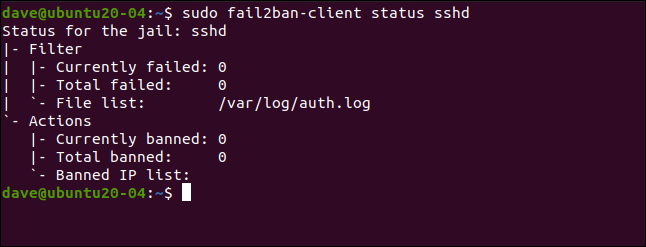
This lists the number of faults and banned IP addresses. Of course, all stats are zero right now.
Testing our jail
On another computer, we will make an SSH connection request to our test machine and misspelt the password on purpose. Gets three attempts to get the correct password on each connection attempt.
the maxretry The value will be activated after three unsuccessful connection attempts, not three failed password attempts. Because, we have to type a wrong password three times to fail the connection attempt.
Then we will make another connection attempt and enter the password incorrectly three more times. The first bad password attempt of the third connection request should be triggered fail2ban.
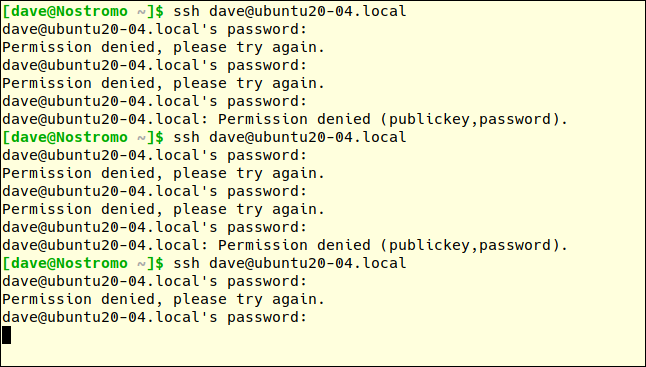
After the first wrong password on the third connection request, we don't get a response from the remote machine. We get no explanation; we only have a cold shoulder.
You must press Ctrl + C to return to the command prompt. If we try one more time, we will get a different answer:
ssh [email protected]

Previously, the error message was “permission denied”. This time, the connection is completely rejected. We are an ungrateful person. They have banned us.
Let's see the details of the [sshd] jail again:
sudo fail2ban-client status sshd
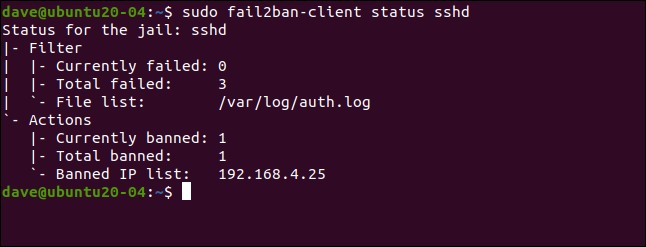
There were three failures and one IP address (192.168.4.25) it was banned.
As we already mentioned previously, fail2ban enforce bans by adding rules to the firewall rule set. Let's take another look at the rule set (before it was empty):
sudo iptables -L
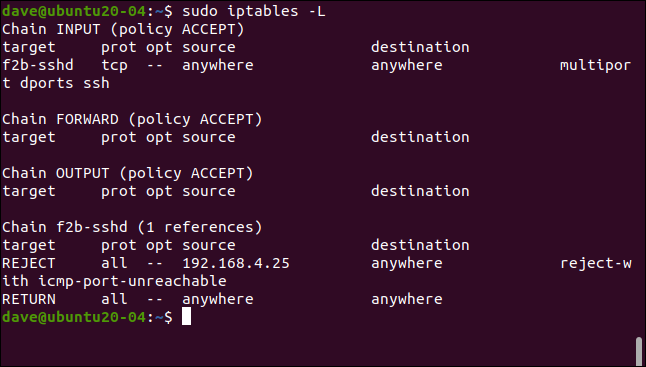
A rule has been added to the INPUT policy, which sends SSH traffic to f2b-sshd chain. The rule in the f2b-sshd The chain rejects SSH connections from 192.168.4.25. We do not modify the default settings for bantime, so that, on 10 minutes, that IP address will be overridden and you will be able to make new connection requests.
If you set a longer ban extension (like several hours), but you want to allow an IP address to make another connection request before, can release it sooner.
We write the following to do this:
sudo fail2ban-client set sshd unbanip 192.168.5.25

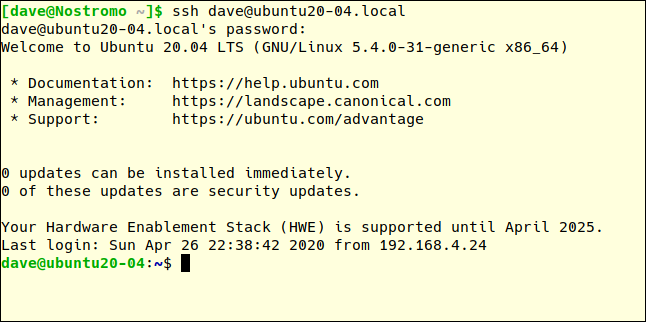
On our remote computer, if we make another SSH connection request and write the correct password, we will be able to connect:
ssh [email protected]
Simple and efficient
The simplest is usually better and fail2ban is an elegant solution to a complicated obstacle. Requires very little configuration and hardly imposes an operational overhead, neither for you nor for your computer.


