
If you want to schedule a Linux job that will occur only once, cron it's exaggerated. the at command family is what you need! And if you want to run processes only when your system has free resources, you can use batch.
How to schedule Linux jobs
the cron demon keeps a list of jobs that you run at specific times. These tasks and programs run in the background at the scheduled time. This gives you great flexibility in scheduling tasks that need to be repeated.. Whether you need to run a task once every hour, at a specific time each day, or at least once a month or a year, you can set it to cron.
Despite this, this doesn't help if you want to schedule a task to run only once. Of course, you can set it in cron, but then you must remember to go back and remove the crontab entry after the task runs, which is inconvenient.
With Linux, if you are struggling with an obstacle, it's almost a guarantee that someone else has also fought with him. Fortunately, because Unix-like operating systems have been around for so long, plus there is a great chance that someone has created a solution to your problem.
For the problem described previously, they have done it and it's called at.
RELATED: How to schedule tasks in Linux: Introduction to Crontab files
Installing the at command
We had to install at in Ubuntu 18.04 and Manjaro 18.1.0 (it was already installed in Fedora 31).
Install at in Ubuntu, use this command:
sudo apt-get install at

After the installation is complete, you can start the at daemon with this command:
sudo systemctl enable --now atd.service

In Manjaro, you install at with this command:
sudo pacman -Sy at

After the installation is complete, type this command to start the at Devil:
sudo systemctl enable --now atd.service

In any distribution, you can type this command to make sure atd the daemon is running:
ps -e | grep atd

How to use the at command interactively
Use at, you must assign a date and time to run. There is a lot of flexibility in the way you can write them, which we will cover later in this post.
Despite this, even when we are going to use at interactively, you must provide the date and time in advance. If you do not include anything on the command line or type something that is not a date and time, at responde con “Tiempo ilegible”, as it's shown in the following:
at
at banana

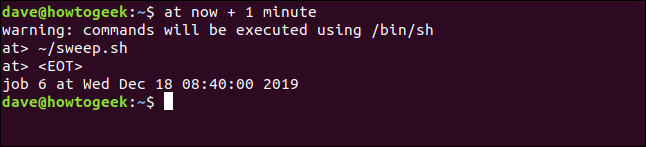
Dates and times can be explicit or relative. As an example, let's say you want a command to run within a minute. at sabe lo que significa “now”, so you can use now and give it a minute, So:
at now + 1 minute

at print a message and a at and wait for you to type the commands you want to program. First, despite this, consider the message, as it's shown in the following:

Tells you at launch an instance of the sh shell and will run the commands within that. Your commands will not run in the bash shell, which is compatible with the sh shell but has a richer set of functions.
If your commands or scripts try to use a function or facility that Bash provides, but sh it doesn't, will fail.
It's easy to test if your commands or scripts will run in sh. Use the sh command to start a sh shell:
sh

The command prompt changes to a dollar sign ($), and now you can run your commands and verify that they work properly.
To return to the bash shell, write the exit command:
exit
You will not see any error messages or standard output from commands. This is because sh shell starts as a background task and runs without any screen interface.
Any output from the commands, good or bad, it is sent to you by email. It is sent through the internal mail system to whoever executes the at command. This means that you must install and configure that internal email system.
A lots of (the majority) of Linux systems do not have an internal email system, since one is rarely needed. Those who typically use a system like send mail O suffix. If your system does not have an internal email system, you can have scripts write to files or redirect output to files to add records.
If the command does not generate an error message or standard output, you will not receive an email anyway. Many Linux commands indicate success through silence, so in most cases, you will not receive an email.
RELATED: What are stdin, stdout y stderr en Linux?
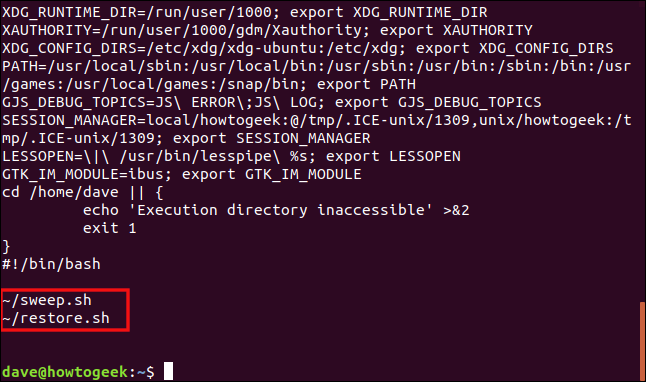
Now is the time to type a command in at. For this example, we will use a small script file called sweep.sh that erases the *.bak, *.tmp, and *.o records. Enter the path to the command, as it's shown in the following, and then press Enter.

Another command prompt appears and you can add as many commands as you want. In general, it's more convenient to have your commands in a single script and just call that script from within at.
Presione Ctrl + D to say at you have finished adding commands. at shows

After the job runs, write the following to verify your internal mail:

If there is no mail, must take over success. In any case, in this circumstance, you can check and see if the *.bak , *.tmp, and *.o The files were removed to confirm that the command worked.
Type the following to run all over again:
at now + 1 minute
After a minute, write the following to recheck your mail:

¡Oye, we have mail! To read message number one, press 1 and then press Enter.
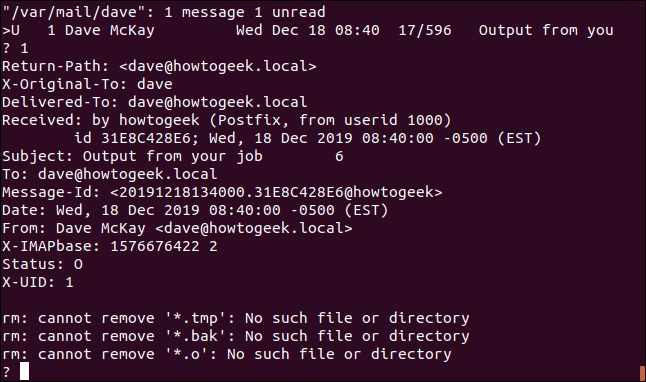
We received an email from at because the commands in the script generated error messages. In this example, there were no files to remove because when we ran the script previously, eliminated them.
Press D + Enter to remove the email and Q + Enter to exit the mail program.
Date and time formats
You have a lot of flexibility when it comes to the time formats you can use with at. Here are some examples:
- Run at 11:00 am:
- Run tomorrow at 11:00 am:
- Run at 11:00 a. M. From this day next week:
- Run at this time, in this day, next week:
- Run at 11:00 am next friday:
- Run at this time next Friday:
- Run at 11:00 am on this date, next month:
- Run at 11:00 am on a specific date:
- Run within 30 minutes:
- Run within two hours:
- Run this time tomorrow:
- Run at this time on Thursday:
- Run at 12:00 am:
- Run at 12:00 pm:
- If you are british, You can even schedule a command to run at tea time (4 p. M.):
Looking at the job queue
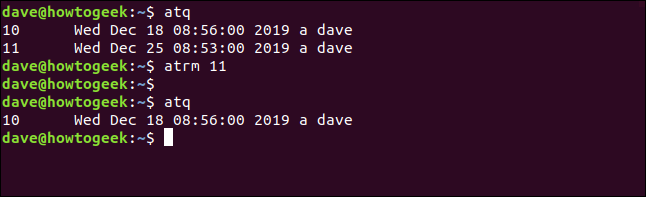
You can write the atq command to view the queue of scheduled jobs, as it's shown in the following.

For each command in the queue, atq show the next information:
- Job identification
- Scheduled appointment
- Scheduled time
- Queue where the job is. Las colas están etiquetadas como “a”, “b”, etc. Normal tasks you schedule with
atentrar en la cola “a”, while the tasks you schedule withbatch(which are discussed later in this post) entran en la cola “b”. - The person who scheduled the job.
Using at on the command line
You should not use at interactively; you can also use it in the command. This makes it easy to use internal scripts.
You can pipe commands to at, like this:
echo "sh ~/sweep.sh" | at 08:45 AM

The job is accepted and scheduled by at, and the job number and execution date are reported as before.
RELATED: How to use Pipes on Linux
Use at with scripts
You can also store a script in a file and then pass it to at. It can be a plain text script file, it doesn't have to be an executable script.
You can use the -f (file) as follows to pass a filename to at:
at now + 5 minutes -f clean.txt

You can achieve the same result if you redirect the file to at:
at now + 5 minutes < clean.txt

Removing scheduled jobs from the queue
To remove a scheduled job from the queue, you can use the atrm command. If you want to see the queue first to find the number of the job you want to remove, you can use atq . Subsequently, use that work number with atrm, As shown below:
and
atrm 11
and
How to view a detailed view of jobs
As we already mentioned previously, can schedule jobs in the future. Sometimes, you may forget what a job is going to do. the atq The command displays the jobs in the queue, but not what they are going to do. If you want to see a detailed view of a job, you can use the -c (cat) option.
First, we will use atq to find the job number:
and

Now, we will use job number 13 with the -c option:
at -c 13
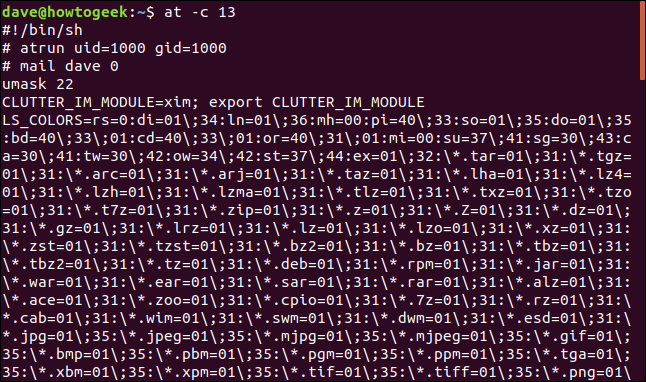
Here's a breakdown of the information we get about the job:
- First line: This tells us that the commands will be executed under the
shshell. - Second line: We see that the commands will be executed with a user and group ID of 1000. These are the values for the person who ran the
atcommand. - Third line: The person who receives the emails.
atsend. - Fourth line: the User mask it is 22. This is the mask that is used to determine the default permissions for any file created in this
shsession. The mask is subtracted from 666, what it gives us 644 (the identical octal ofrw-r--r--). - Remaining data: Most are environment variables.
- Results of a test. A test checks to make sure the run directory can be entered. If he can not, an error is generated and job execution is abandoned.
- The commands to execute. These are listed and the content of the scripts that are scheduled is displayed. Note that even though the script in our example above was written to run in Bash, will still run on a
shshell.
The batch command
the batch command operates similarly al at command, but with three significant differences:
- You can only use the
batchcommand interactively. - Instead of scheduling jobs to run at a specific time, adds them to the queue and
batchThe command executes them when the average system load is less than 1,5. - Due to the above, never specify a date and time with the
batchcommand.
When you use the batch command, calls it by name without command line parameters like this:
batch
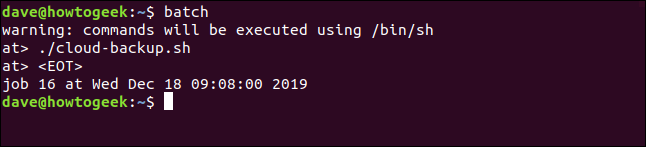
Next, add tasks just as you would with the at command.
Control access to the at command
the at.allow and at.deny the files control who can use the at command family. These are within the /etc directory. Default, only the at.deny file exists and is created when at it's installed.
This is how these work:
at.deny: List the applications and entities that cannot be usedatto schedule jobs.at.allow: Lists they can useatto schedule jobs. If heat.allowThe file does not exists,atjust use theat.denyproceedings.
By default, anyone can use at. If you want to restrict who can use it, use el at.allow file to list the ones that can. This is easier than adding everyone who can't use at al at.deny proceedings.
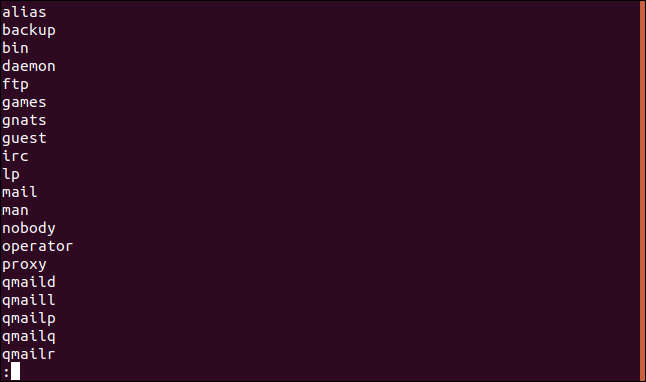
This is what at.deny the file looks like:
sudo less /etc/at.deny

The file lists the operating system components that they cannot use at. Many of these are unable to do so for security reasons, so you don't want to remove any of the file.
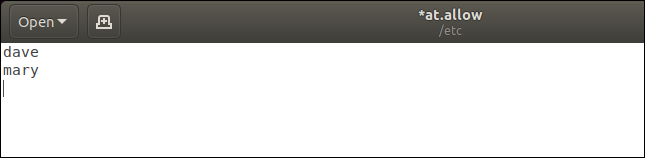
Now, we will edit the at.allow proceedings. Let's add dave and mary, but no one else will be able to use at.
First, we write the following:
sudo gedit /etc/at.allow

In the editor, we add the two names, as it's shown in the following, and then we save the file.
If someone else tries to use at, they will tell you that you do not have permission. As an example, let's say a user named eric write the following:
at
Would be rejected, as it's shown in the following.

Again, eric Is not in the at.deny proceedings. As soon as you put someone in the at.allow file, all others are denied permission to use at.
Great for exceptional occasions
As you can see, both of them at and batch they are ideal for tasks that you only need to run once. Again, as a quick review:
- When you need to do something other than a regular procedure, program with
at. - If you want to run a task only when the system load is low enough, use
batch.


