Developing or debugging code within Docker containers can be tricky. In general, I would attach it to the container and use the shell utilities to edit files. Visual Studio Code's Remote Containers extension enables you to open folders inside containers, so you can work with them in your code editor.
Remote development works with Docker Desktop 2.0 and higher for Windows and macOS and Docker Engine 18.06 and higher for Linux. If you are using Windows 10 Home, must have April update 2020, Docker Desktop 2.3 and Windows Subsystem for Linux installed.
On the side of the container, VS Code supports x64 and ARM containers. Can use Alpine operating systems, Debian, Ubuntu, CentOS and RHEL. If your base image doesn't work right away, you should be able to install additional packages inside it for complete connection.
Starting
Inicie VS Code, presione Ctrl + Shift + P and look “extensions”. Select item “Install extensions” to bring up the sidebar. Inside the extensions panel, I searched “Remote – Containers” and install the respective element.
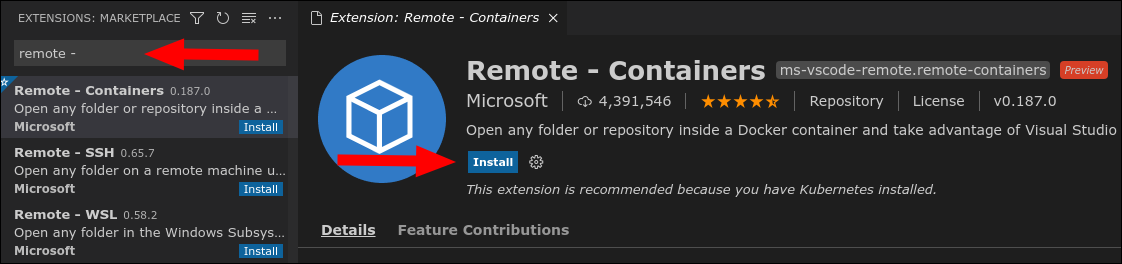
After the extension is installed, a new green button will appear at the bottom left of the status bar. Click here to bring up the command palette, preloaded with available remote commands. If you prefer to avoid using the mouse, you can also find the commands by pressing Ctrl + Shift + P and typing “remote”. The extension will also appear in other areas of the user interface, such as the welcome page and the folder opening panel.
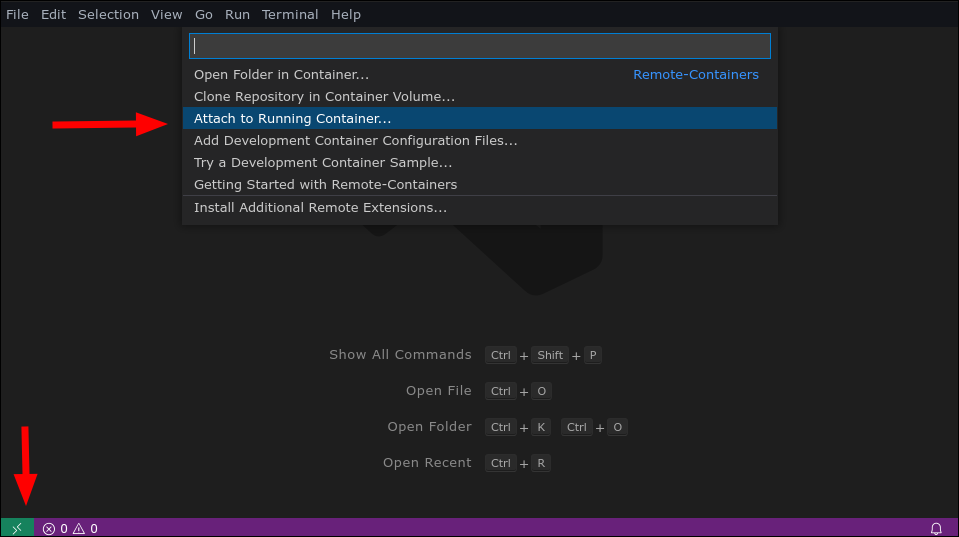
To open your first Dockerized folder, open the command list and select “Attach to running container”. You should acknowledge a warning that the container could execute untrusted code. You should only attach to containers created from images you trust, since a malicious container with a VS Code workspace file could compromise your system.
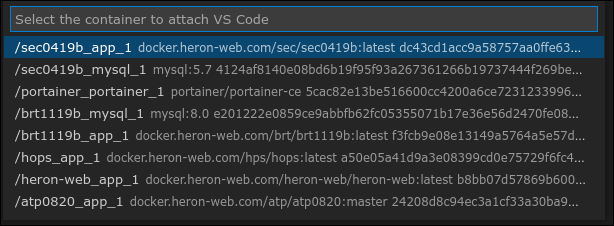
VS Code will list the Docker containers running on your system. Select the container you want to connect to. A new window will open. It might take a few seconds to start while VS Code installs its remote server components in the container. You will see the active container displayed at the bottom left of the status bar.
Once the window is ready, can start working. Click the button “Open folder” in the left pane to bring up a file picker prompt. This shows the file system within The container. Navigate to the directory you want to open and press “To accept”.
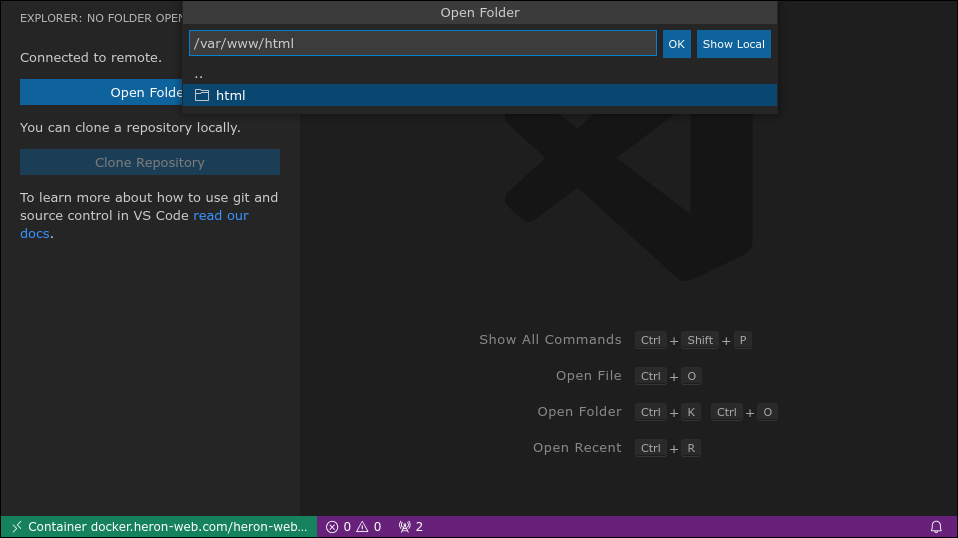
The sidebar will update to show the contents of the selected directory. Click on any of the files to open it in the VS Code editor. You can now make changes inside the container, without manually copying files or setting a working directory link mount. This maximizes efficiency when using a Dockerized development environment or debugging a malfunctioning container.

The full set of VS Code features is enabled, including completion of IntelliSense code and its debugging toolkit. Panels such as the console and terminal will be attached to the container's input and output streams.
How does it work?
The first thing to recognize about integration is that VS Code will alter your container's file system. You will install a server in the containers you connect to, that will send information to the publisher's client.
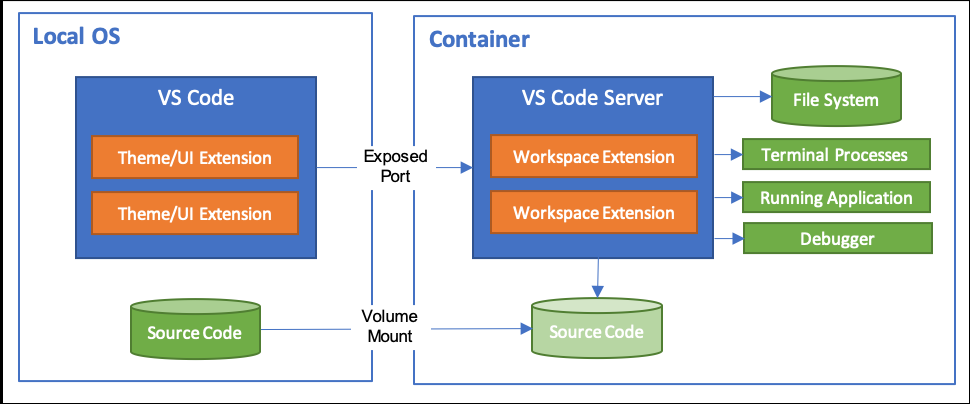
The server monitors the file system, read files and start processes inside the container. This powers capabilities like the VS Code debugger. The editor will ask the server to run your font, allowing you to inspect the code running inside the container.
Similarly, VS Code will install copies of your other extensions inside the container. This ensures that they have full access to the container's file system, so they will operate without discrepancies compared to a local folder. The end result is a complete editor experience that works seamlessly., even though it spans across your host and containers. Depending on the size of your environment, the first run setup may take a few minutes, but the container server will be cached for later use.
Development containers
Beyond opening files in an existing container, the remote system enables you to set up development containers that encapsulate your work environment. This container should include all the software dependencies that you would install before developing your application locally..
When you use a development container, may or link mount your working directory or use an isolated volume. The latter option prevents file system contamination and offers improved performance, since it is more native to Docker.
Development containers are created from .devcontainer/devcontainer.json records. These describe the Docker and Visual Studio setup that starts your development environment.
{
    "image": "mcr.microsoft.com/vscode/devcontainers/javascript-node:16",
    "extensions": "EditorConfig.EditorConfig",
    "forwardPorts": [3000]
}
the devcontainer.json file shown above configures a development container that Microsoft uses Plantilla Node.js. the EditorConfig VS Code extension is enabled, adding support for .editorconfig files in your working directory. After, port 3000 mapped from host to container.
Development container files support a some other options what's more. You can set VS Code settings.json values, add a command to run inside the container and define the user that the VS Code server will run as.
If you don't want to create a container configuration file yourself, the Remote containers: add development configuration files The command will add one to your project automatically. You will be able to choose from a list of preconfigured templates that you can customize later.
Once you have a devcontainer.json file in your project, run the Remote containers: Rebuild Container command from command palette. This will create a container image using the specified settings. When the compilation is complete, run Remote containers: reopen folder in container to open your current local directory inside a new development container.
If you are using a Git repository, in general it is easier to clone the repository directly in a container. the Remote containers: Clone the repository to the container volume The command accepts a Git url to clone. Create a new volume and attach it to a development container instance. This enables you to work on Git repositories without cloning them to your local filesystem, avoiding unnecessary contamination. VS Code automatically shares your local Git credentials with the container.
Configure the extension
The Remote extension – Containers come with various configurations that allow you to configure your container experience. You can find them with the Remote containers: configuration for remote containers command.
The first collection of settings refers to point files. Point files refer to configuration files that start with a period (.). Remote-Containers can automatically clone a Git repository of dotfiles into new containers, which helps you run your usual setup.
Add the URL of the dotfiles repository to the Repository setting. The repository will be cloned into the Target Path route, which by default is ~/dotfiles. If you want to run a command after cloning the repository, specify it as Install Command.
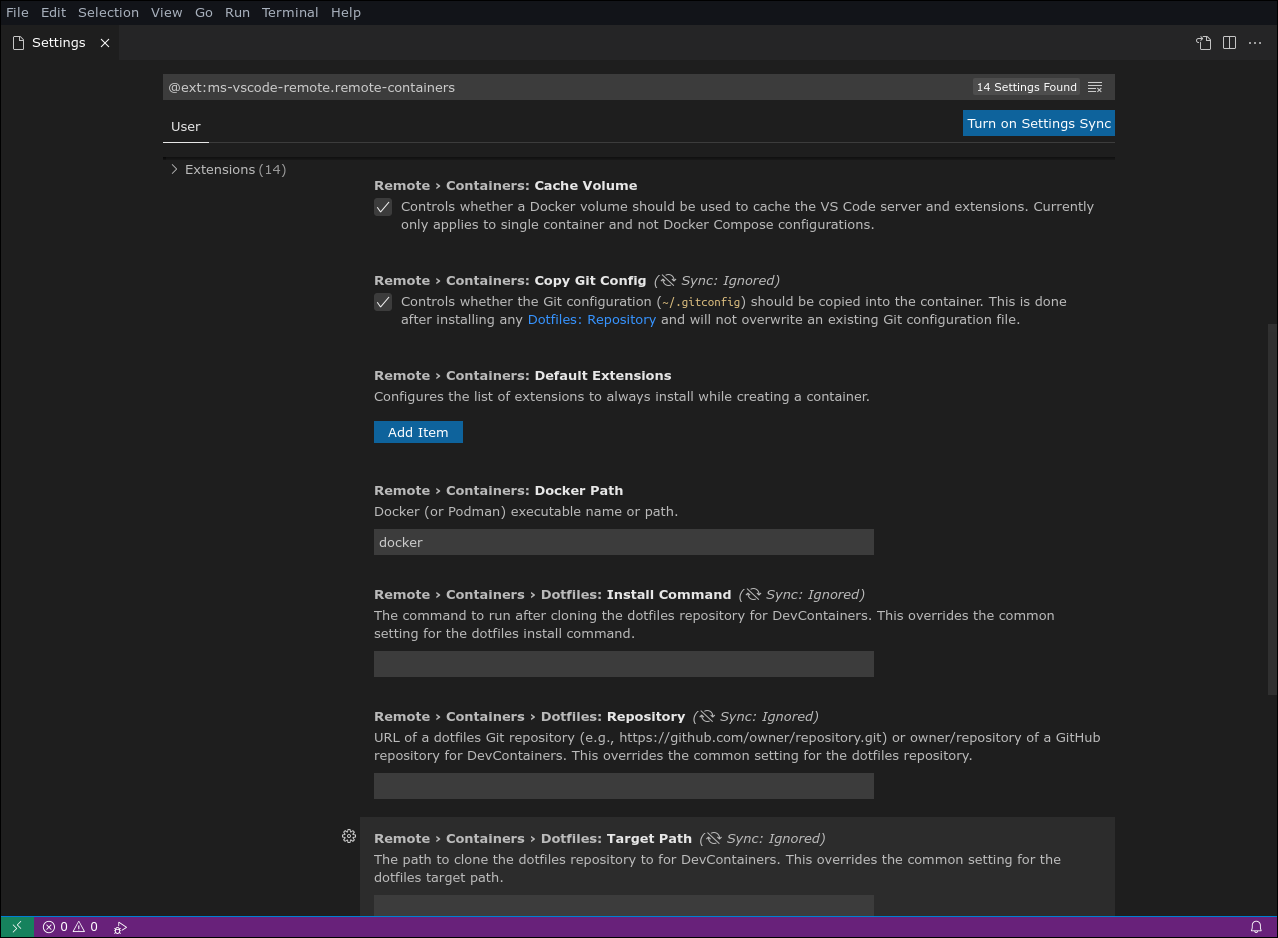
Remote-Containers uses by default docker as the binary that executes the container commands. You can change this to any binary supported by the Docker CLI with the Docker Path setting. If you are using Podman, specifying podman since this value will allow you to work with your containers using VS Code.
You can configure default remote extensions in the Default Extensions Vault. Click on “Add item” to select an extension to add to each container. This enables you to guarantee the global availability of your required extensions., even if they are not listed in a devcontainer.json proceedings.
One last group of settings refers to Git settings. When it is marked “Copy Git configuration”, its .gitconfig The file will automatically be copied to containers automatically. Enabling this ensures that your commits are correctly attributed to user details that you are already using locally.
The configuration of “Git credential wizard configuration location” controls the config file to which the new Git credentials will be written. You can choose from your local file per user, ~/.gitconfig, or the location of the global system, /etc/gitconfig.
Summary
The Remote extension – Containers for Visual Studio Code enables you to edit files and folders within Docker containers. Works seamlessly with VS code editor functions, including IntelliSense, directory indexing, debugging and extensions. Internally, VS Code launches a dev server inside the container so your tools have full access to the filesystem they are working with.
There are several possible use cases for this functionality, with Dockerized development environments and on-the-fly container editions as the top contenders. While the idea of using containers to systematize development has been around for a while, VS Code makes it much easier to get started by offering an IDE experience that natively understands Docker.
You can prepare a Docker image that gives developers everything they need to work on their system: programming language, dependencies and convenience tools. Developers would start a container, they would connect to it from VS Code and do their job without installing anything (excepto Code) on your own machine. Whether to patch a dependency, you just need to update the shared docker image and have the developers pull the new tag.


