
Using REST API to extend your scripts is a useful feature to implement. You can get access to new functionalities and the possibilities of creating new more advanced scripts are expanded.
But the experience for many when starting to use REST API in scripts is that it feels quite clunky and unnatural. In this post we discuss:
- What is a REST API
- How to read the most common form of documentation
- How to use a REST API with PowerShell
- Some tips and tricks on how to make it a better and easier experience
What is REST?
REST, o API RESTful, is an API that uses HTTP requests to search, add, delete or manipulate data in different services.
What we want to do with the data is generally decided by what HTTP method what do you use. Here is a summary list of HTTP methods and what they are used to do in a REST API:
- GET - Read
- TO POST: create
- PATCH: upgrade / partial modification
- PUT: update or replace
- DELETE: Remove
The data returned by a REST API is generally returned in JSON format.
Now, let's start with our first API call!
Read the docs
Learning to read and interpret the documentation of different REST APIs is essential to use them. Fortunately, if you know how to read a doc style, can quickly learn to read other.
We are using petstore.swagger.io in this post, since it uses the popular Strut framework that is quite common to find in the real world.
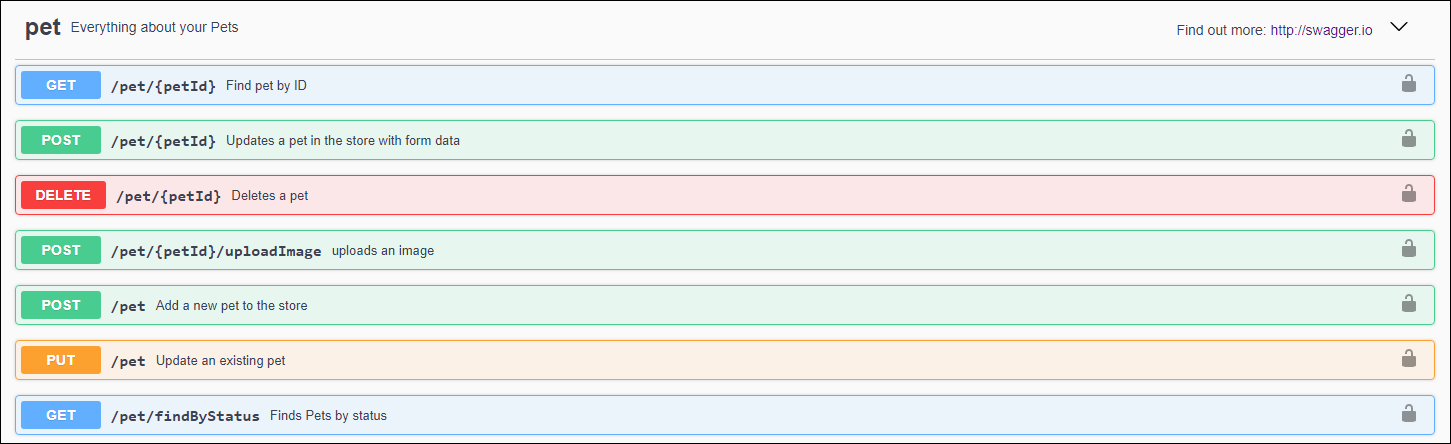
The image above shows the most essential information about REST API endpoints:
- HTTP method: GET / POST / DELETE, etc.
- RELATIVE URL to the REST API endpoint (the base URL is generally presented at the top of the documentation page)
- A brief description
Go into the details
The first page of the documentation is excellent and, in general, you can make most calls that require the http get method with that information. But methods like POST and SET generally require you to click and expand the row to get more information.
If you click on one of the rows, you are presented with information similar to this:
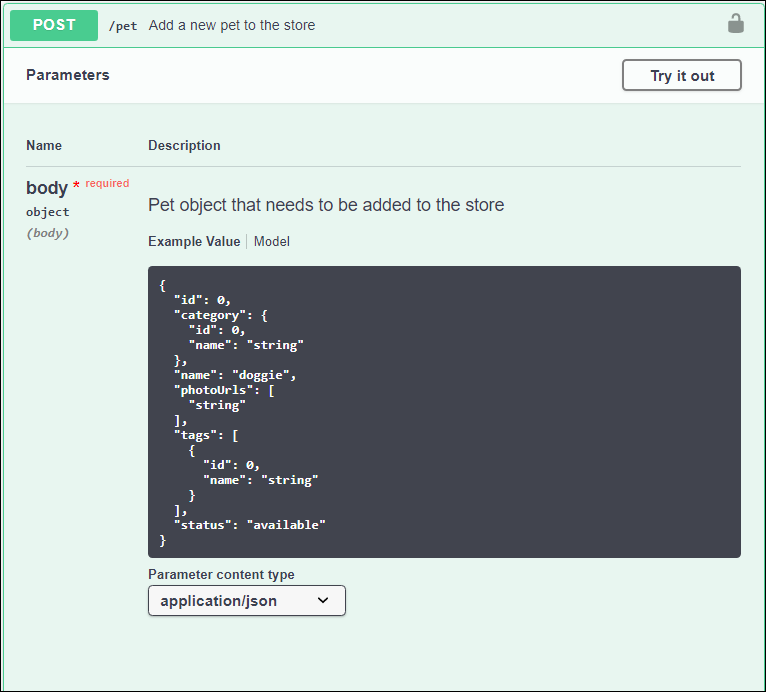
Here, we introduce REST endpoint which can create a new pet object. Specifies how the JSON that was provided in the body of the POST should look and what type of content it accepts. Other REST endpoints specify what their different parameters are, what kind of data it should be, etc.
That's the basics of reading the documentation. Now that it's clear, it's time to start using REST APIs with PowerShell.
GET (Ting) your first data
Using REST APIs with PowerShell is usually fairly straightforward and you are using built-in cmdlets, so no additional modules are needed. You will get data through the GET method in / Pet / {petId} endpoint.
If you expand the / Pet / {petId} endpoint in the documentation, you can see that {petId} is actually a parameter that takes an integer.
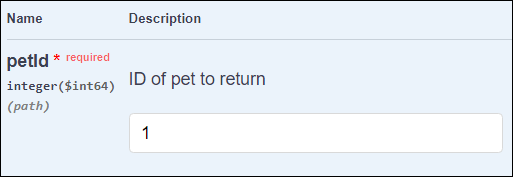
That makes the url to search for the pet object with id 1: https://petstore.swagger.io/v2/pet/1
The SWAGGER REST API documentation generally presents the base URL at the top of the page.
Now, let's start with PowerShell. Open a Terminal window and enter:
PS51 > Invoke-RestMethod -Method GET -ContentType "application/json" -Uri "https://petstore.swagger.io/v2/pet/1"

id        : 1
category  : @{id=0; name=string}
name      : doggie
photoUrls : {string}
tags      : {@{id=0; name=string}}
status    : available
Invocar-RestMethod converts the JSON returned automatically to an object, since the content type “application / json” is returned in the server solution.
Error 404 - Not foundgenerally means that the object cannot be found, not that the url is misspelled.
You have now successfully made your first REST API call. But only being able to GET data is quite limiting, therefore let's create something with the POST method.
Create an object with the POST method
The POST method is most commonly used to create, how to create users or entries, etc. A POST request sends a BODY containing information to the REST endpoint, generally in JSON format, but it can also be a URL-encoded form.
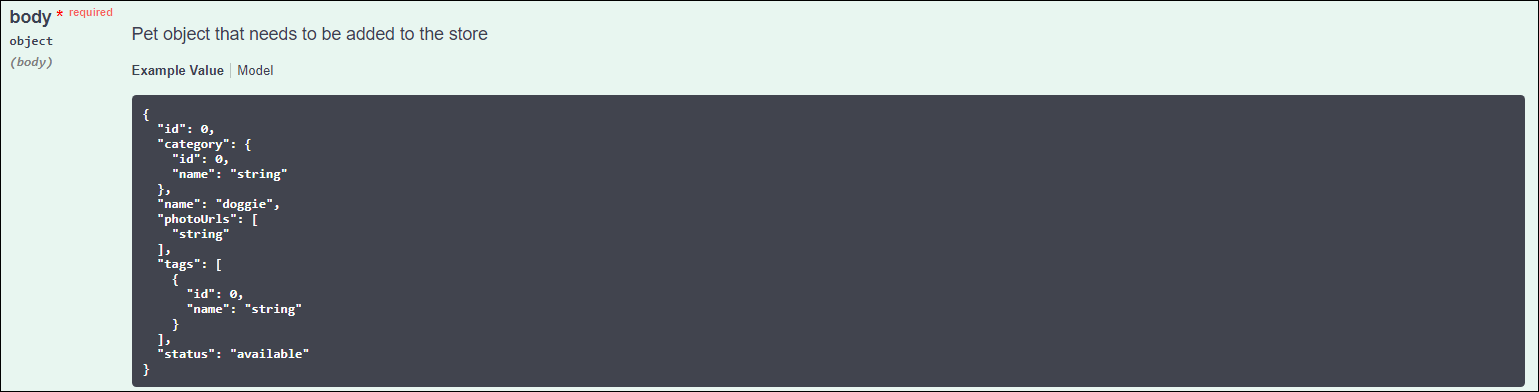
You will learn how to create a JSON object that you can POST to the /mascot endpoint.
You can see what the JSON is supposed to look like if you expand the POST / mascot row in documentation.
Let's start by creating a hash table that we can later convert to a JSON object. Raw JSON should be avoided in PowerShell scripts as it limits its capabilities.
$Body = @{
    id = 19
    category = @{
        id = 45
        name = "Whatever"
    }
    name = "Dawg"
    photoUrls = @(
        "string"
    )
    tags = @(
        @{
            id = 0
            name = "string"
        }
    )
    status = "available"
}
If you are having difficulty creating a hash table that is converted to the JSON you want, install the PsdKit module and use the command:
$JsonString | ConvertTo-Psd
You now have a hash table that you can convert to a JSON and POST string in the /mascot endpoint:
$JsonBody = $Body | ConvertTo-Json
$Uri = "https://petstore.swagger.io/v2/pet"
Invoke-RestMethod -ContentType "application/json" -Uri $Uri -Method Artículo -Body $JsonBody

id        : 19
category  : @{id=45; name=Whatever}
name      : Dawg
photoUrls : {string}
tags      : {@{id=0; name=string}}
status    : available
When the object is created, regularly receives the object that was created for confirmation.
Using DELETE
The DELETE method deletes data, and the way to do it is quite similar to the get method as shown here:
PS51 > Invoke-RestMethod -Method DELETE -ContentType "application/json" -Uri "https://petstore.swagger.io/v2/pet/1"Just keep in mind so you don't delete anything you might need.
Using PUT
The PUT method updates existing data. this is done similarly to the post method, sending a full or partial JSON object:
PS51> $Body = [PSCustomObject]@{
    id = 19
    name = "Dawg with a new name"
}

PS51> $JsonBody = $Body | ConvertTo-Json
PS51> $Uri = "https://petstore.swagger.io/v2/pet"
PS51> Invoke-RestMethod -ContentType "application/json" -Uri $Uri -Method PUT -Body $JsonBody

id name                 photoUrls tags
-- ----                 --------- ----
19 Dawg with a new name {}        {}
In general, the REST API returns a JSON object with the data used and / or updated. you can see that the object was updated by using the get method to it:
PS 51> Invoke-RestMethod -ContentType "application/json" -Uri "https://petstore.swagger.io/v2/pet/19"

id        : 19
category  : @{id=45; name=Whatever}
name      : Dawg with a new name
photoUrls : {string}
tags      : {@{id=0; name=string}}
status    : available
Creating functions
Writing these commands as they are can become quite tedious and is not truly scalable.. If we call an endpoint more than once, create a function for it. It's quite simple and only a few lines are needed:
Function Get-PetstorePet {
    [cmdletbinding()]
    param(
        # Id of the pet
        [Parameter(Mandatory,ValueFromPipeline)]
        [int]$Id
    )
    Begin{}
    Process{
        $RestMethodParams = @{
            Uri = "https://petstore.swagger.io/v2/pet/$Id"
            ContentType = "application/json"
            Method = "GET"
        }
        Invoke-RestMethod @RestMethodParams
    }
    End{}
}
After you create your role, you can call it in your script:
PS51> Get-PetstorePet -Id 1

id name    photoUrls             tags
-- ----    ---------             ----
 1 Doggie  {http://picture.dirección url}  {}
You can do this for the POST method and to create a new pet in the pet store:
Function Add-PetstorePet {
    [cmdletbinding()]
    param(
        # Id of the pet
        [Parameter(Mandatory,ValueFromPipelineByPropertyName)]
        [int]$Id,
        # Name of the pet
        [Parameter(Mandatory,ValueFromPipelineByPropertyName)]
        [string]$Name,
        # Status of the pet (available, sold etc)
        [Parameter(Mandatory,ValueFromPipelineByPropertyName)]
        [string]$Status,
        # Id of the pet category
        [Parameter(Mandatory,ValueFromPipelineByPropertyName)]
        [int]$CategoryId,
        # Name of the pet category
        [Parameter(Mandatory,ValueFromPipelineByPropertyName)]
        [string]$CategoryName,
        # URLs to photos of the pet
        [Parameter(Mandatory,ValueFromPipelineByPropertyName)]
        [string[]]$PhotoUrls,
        # Tags of the pets as hashtable array: @{Id=1;Name="Dog"}
        [Parameter(Mandatory,ValueFromPipelineByPropertyName)]
        [Hashtable[]]$Tags
    )
    Begin{}
    Process{
        $Body = @{
            id = $Id
            category = @{
                id = $CategoryId
                name = $CategoryName
            }
            name = $Name
            photoUrls = $PhotoUrls
            tags = $Tags
            status = $Status
        }
        $BodyJson = $Body | ConvertTo-Json
        $RestMethodParams = @{
            Uri = "https://petstore.swagger.io/v2/pet/"
            ContentType = "application/json"
            Method = "Artículo"
            Body = $BodyJson
        }
        Invoke-RestMethod @RestMethodParams
    }
    End{}
}
And calling this PowerShell function afterwards makes this rather lengthy task a lot easier:
PS51> $AddPetStorePetsParams = @{
    Id = 44
    Name = "Birdie"
    Status = "available"
    CategoryId = 50
    CategoryName = "Hawks"
    PhotoUrls = "https://images.contoso.com/hawk.jpg"
    Tags = @(
        @{
            Id=10
            Name="Not eagles"
        }
    )
}
PS51> Add-PetStorePet @AddPetStorePetsParams

id        : 44
category  : @{id=50; name=Hawks}
name      : Birdie
photoUrls : {https://images.contoso.com/hawk.jpg}
tags      : {@{id=0}}
status    : available
Most likely, many of the modules you use on a daily basis are made of functions that only use REST APIs in the background.
Summary
Learning to use REST APIs is primarily about learning to read the documentation. We use SWAGGER-based documentation in this post, since it represents what other documentation styles can look like.
At the same time, turning your API calls into a function can save you a lot of time, make your work easier and clean your scripts.


