
Microsoft Word comes with predefined page setups for creating books. Whether you are creating a memory or event guide, these settings allow you to create a beautiful book or brochure, from beginning to end.
Create a book or brochure
First, go ahead and open Word. It is recommended that you adjust these settings before writing your book content to avoid formatting problems in the future..
Once you are in Word, go to the tab “Design”. In the group “Page setup”, click the small arrow at the bottom right.
![]()
This opens the window “Page setup”, where it will automatically be in the tab “Margin”. In the group “Margins”, you can set the page margins. By default, the margin of “gutter” will be set in 0. This could cause problems later, since the gutter margin is the amount of space between the content of your book and the crease where the pages of the book will meet. Having said that, go ahead and give the gutter a margin of 1 ”, so your book content doesn't get lost in the fold.
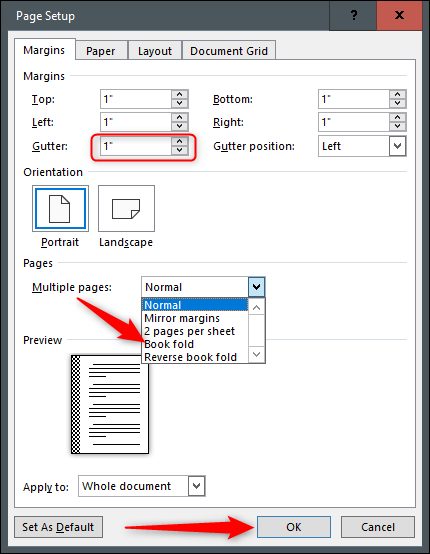
Next, select the arrow next to “Multiple pages” in the group “pages”, then select “Folded book” in the drop-down menu. Once selected, you will notice that the orientation of your page automatically changes from “Vertical” a “Horizontal”.
Tip: You may notice a choice of “Reverse Book Fold”. This is for content that reads from right to left, like japanese style books.
Once you have adjusted the settings, click on “To accept”.
The page setup for creating a book or brochure is now complete. There are a lot of things you can do from here depending on what you need for your book. You may want to add a header or footer, create a table of contents or provide page numbers of your book for easy navigation. We will leave the content and add-ons to you; we are only here to show you how to create the configuration.
It is also worth noting that, depending on the length of your document, you may need to divide it into multiple booklets due to the large size of the document. It's okay, you can join them in a book later.
RELATED: How to reduce the size of a Microsoft Word document
Print your book or brochure
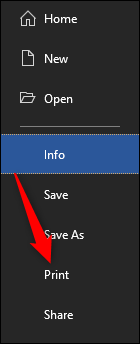
Once you have finished composing your book, it's time to print it. Select the tab “File”, then select “To print” found in the left panel.
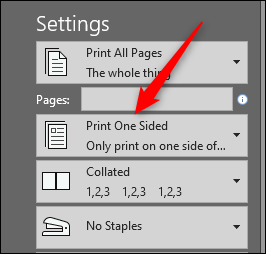
Next, select the second option in the group “Setting”.
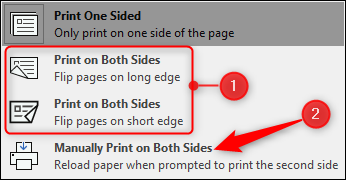
A drop-down menu will appear presenting a few different print style options. If you have a duplex printer, select (1) "Print on both sides" (and whether you want to turn the page on the long or short edge or not). If your printer does not have this feature, you must select the option (2) “Manually print on both sides”.
All that is left to do now is select Print, and ready!
setTimeout(function(){
!function(f,b,e,v,n,t,s)
{if(f.fbq)return;n=f.fbq=function(){n.callMethod?
n.callMethod.apply(n,arguments):n.queue.push(arguments)};
if(!f._fbq)f._fbq = n;n.push=n;n.loaded=!0;n.version=’2.0′;
n.queue=[];t=b.createElement(e);t.async=!0;
t.src=v;s=b.getElementsByTagName(e)[0];
s.parentNode.insertBefore(t,s) } (window, document,’script’,
‘https://connect.facebook.net/en_US/fbevents.js’);
fbq(‘init’, ‘335401813750447’);
fbq(‘track’, ‘PageView’);
},3000);


